Frequently Asked Questions
Start here — this covers everything you need to get up and running.
Getting Started
What do I need to get started with Workspace MCP Cloud?
You'll need to decide on three things during onboarding:
- OAuth Client: Use your own internal client ID and client secret, or use the central/shared one. If you're in a corporate Google Workspace environment, an internal client ID is recommended — certain workspace-specific features like Google Chat spaces require your own app.
- Access Model: Choose between an allowlist model (only specific email addresses can sign in) or open access to all addresses.
- Endpoint: You can get a custom subdomain (e.g.,
yourcompany.workspacemcp.com) or use the standard endpoint.
How do I submit my OAuth client ID and secret?
Submit them securely at https://workspacemcp.com/welcome.
It's a one-way submission used to provision your instance, then
purged after configuration is complete.
What is my MCP server endpoint URL?
Your endpoint follows the pattern: https://yoursubdomain.workspacemcp.com/mcp if you chose a custom endpoint. If you selected central, your address
will be https://mcp.workspacemcp.com/mcp — custom client ID
is not supported for this model.
Plans & Access
Which plan should I choose?
Student is for one learner who wants a safe, managed foundation for learning AI and agentic tool use. It uses the shared endpoint with allowlist-only access for a single Google account.
Standard is the fastest path. It uses the shared Workspace MCP Cloud endpoint with allowlist-only access and requires no custom OAuth setup on your side.
Custom is for teams that want more control. You can use a branded subdomain, keep the central Workspace MCP client on a custom endpoint, or bring your own Google Cloud client ID. If you bring your own client ID, it runs on a custom endpoint rather than the shared one.
Enterprise Unlimited is the white-glove option for dedicated deployment, onboarding help, or running the service in your own environment.
If you're not sure, start with Student for individual learning or Standard for a team. You can move to Custom later if you need your own client ID or a branded endpoint.
Who manages the allowlist?
Student, Standard, and any setup using the central Workspace MCP client ID are allowlist-only. Add or update users through the onboarding form or by replying to your welcome email.
If you bring your own Google Cloud client ID, Workspace MCP stops managing the allowlist for you. Access is then controlled from your Google Cloud OAuth consent screen, where you can keep it restricted or open it more broadly.
Either way, each person signs in with their own Google account and only sees data they already have permission to access in Google Workspace.
OAuth & Google Cloud Setup
Do you need to follow these steps?
If you are on the Student or Standard plan, or if you chose to use the Workspace MCP shared client ID on a Custom plan, you can skip this entire section. Your OAuth client is already configured for you — head straight to Client Setup to connect.
Bringing your own Google Cloud client ID is only available on the Custom and Enterprise plans. The steps below apply only if you chose that option during onboarding.
What OAuth client type should I use — Desktop or Web Application?
You must use "Web Application" type. This is the single most common mistake new users make. The Desktop application type is only appropriate for local/self-hosted instances where you're running it directly in Claude Code via stdio. Because Workspace MCP Cloud is a hosted remote server, it requires the Web Application client type.
If you accidentally created a Desktop type client, you'll need to recreate it as Web Application and resubmit your credentials.
What do I put for Authorized JavaScript Origins and Authorized Redirect URIs?
For a hosted Workspace MCP Cloud deployment, configure your Google Cloud Web Application client like this:
- Authorized JavaScript Origins:
https://yoursubdomain.workspacemcp.com - Authorized Redirect URIs:
https://yoursubdomain.workspacemcp.com/oauth2callback
Replace yoursubdomain with your actual subdomain. If
you are also testing a browser client locally, you can add http://localhost:8000 as an additional JavaScript origin.
The example below shows that dual setup.

/oauth2callback redirect URI are the required
values.Where do I find the Client ID configuration page in Google Cloud?
Navigate to: Google Auth Platform > Clients > (your Client ID)
The Authorized JavaScript Origins and Authorized Redirect URIs fields are on this page. Note: These fields only appear for "Web Application" client types, not Desktop types.
Which Google APIs do I need to enable?
The Workspace MCP GitHub README has a section with "Quick API Enable Links" that provides direct links to enable each required API, saving you from clicking around in the console. See: OAuth Credential Setup Guide
How do I set up Google Chat tools?
Google Chat requires your own OAuth client, so it's only available on Custom and Enterprise plans. Unlike other Workspace services, enabling the Chat API is not enough — the API refuses every request until you also configure a Chat app, and it only works with Google Workspace accounts. Two extra steps are required.
1. Configure the Chat app
Enabling chat.googleapis.com alone causes every Chat
tool to fail. You must also complete the Configuration tab so the API has an app identity to
attach requests to:
- Open Chat API → Configuration (APIs & Services → Enabled APIs → Google Chat API → Configuration)
- Fill in the three required fields under Application info:
- App name — e.g.
Workspace MCP(up to 25 characters) - Avatar URL — any HTTPS URL to a square PNG/JPEG
- Description — e.g.
Workspace MCP(up to 40 characters)
- App name — e.g.
- Click Save
This server authenticates as the signed-in user (user OAuth), not as a bot. You do not need to enable interactive features, create a service account, or publish the app — the Configuration form is the only Chat-specific setup required.
2. Use a Google Workspace account
The Chat API is not available to personal @gmail.com accounts. Configuring it with one
returns Google Chat API is only available to Google Workspace users. Sign in with a Business/Enterprise Google Workspace account.
The required scopes (chat.spaces.readonly, chat.messages.readonly, chat.messages, chat.spaces) are requested automatically during the
OAuth flow — no manual scope configuration is needed. See Google's Configure the Chat API and User authentication guides for more detail.
Client Setup
How do I set up Workspace MCP in Claude Code?
Run this command in your terminal:
claude mcp add --transport http workspacemcp https://yoursubdomain.workspacemcp.com/mcpAfter running the command, use /mcp in Claude Code to trigger
the authentication flow. You'll be redirected to sign in with your Google
account.
Tip: If you get a paste formatting error, make sure you're copying the command cleanly without any hidden formatting characters. Type or paste it fresh.
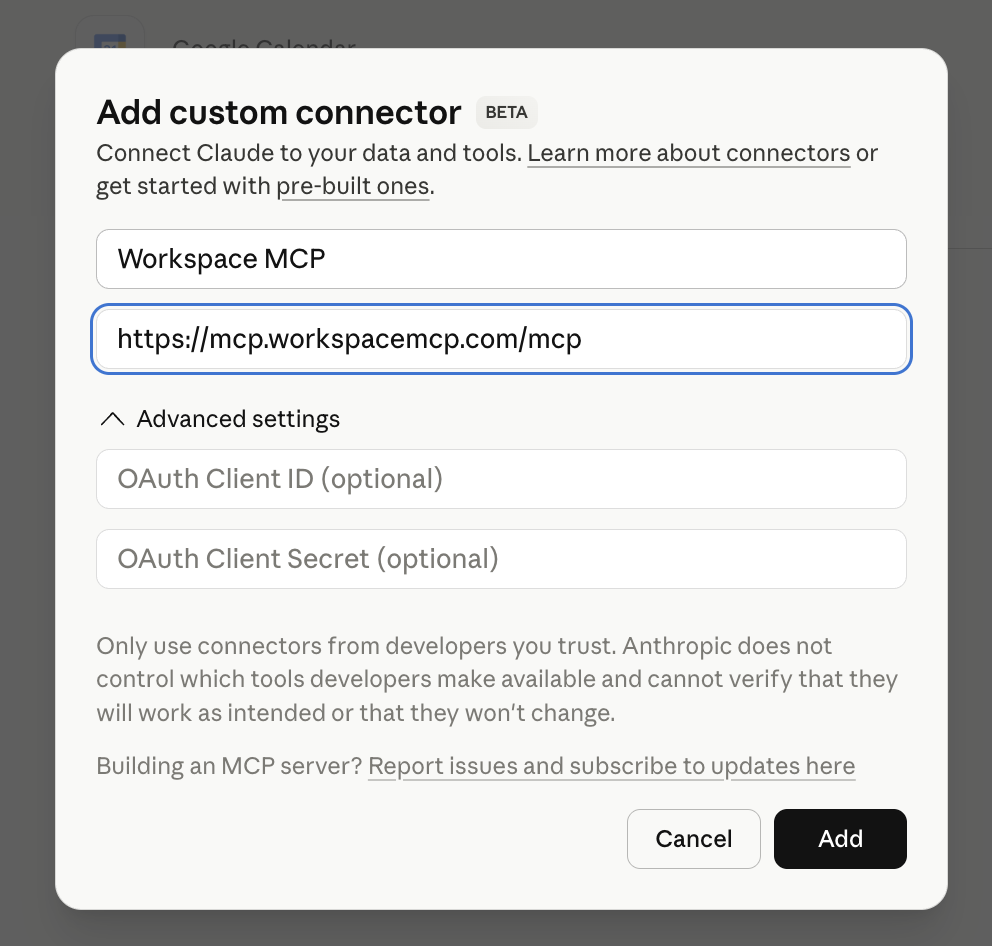
How do I set up Workspace MCP in Claude Desktop, Claude cowork, or scheduled tasks?
Use Claude's custom connector flow. This works for Claude Desktop and Claude on the web, including Claude cowork and scheduled tasks wherever custom connectors are available.
- Open Connectors in Claude
- Choose Add custom connector
- Name it Workspace MCP and enter the MCP address
from your welcome email, such as
https://yoursubdomain.workspacemcp.com/mcp - Click Add, then complete the login flow
You do not need to edit claude_desktop_config.json for
this hosted cloud setup.

How do I set up Workspace MCP in Cursor?
Option 1 — Deeplink (Recommended): An "Add to Cursor" deeplink can be provided that installs it automatically. After clicking it, the server will show "needs authentication" — click "Connect" and sign in with Google.
Option 2 — Manual mcp.json config: Add the
following to your Cursor mcp.json file:
{
  "mcpServers": {
    "workspacemcp": {
      "url": "https://yoursubdomain.workspacemcp.com/mcp"
    }
  }
}Important: Make sure Cursor is updated to the latest version. Older versions may not display the MCP settings pane at all.
How do I set up Workspace MCP in VS Code?
Install VS Code from Microsoft's download page (macOS, Windows, and Linux). VS Code's agent mode supports MCP with Streamable HTTP and OAuth 2.1 (plus OAuth 2.0 IdPs).
You can add the server in several ways:
- Open the MCP gallery in the Extensions view (
@mcp) and use MCP: Add Server - Edit
.vscode/mcp.jsonor your usermcp.jsondirectly - Use the CLI:
code --add-mcp
For a remote HTTP server, add a config block like:
{
  "servers": {
    "workspacemcp": {
      "type": "http",
      "url": "https://yoursubdomain.workspacemcp.com/mcp"
    }
  }
}
How do I set up Workspace MCP in Windsurf?
Install Windsurf for macOS, Windows, or Linux. Windsurf supports stdio, Streamable HTTP, and SSE transports, with OAuth support for each.
To add the server:
- Marketplace: Open the MCP Marketplace from Cascade and click Install
- Manual: Edit
~/.codeium/windsurf/mcp_config.jsonand add your server usingserverUrlorurl
How do I set up Workspace MCP in Open WebUI?
- Open Admin Settings → External Tools
- Click + (Add Server)
- Set Type to MCP (Streamable HTTP)
- Enter your Server URL:
https://yoursubdomain.workspacemcp.com/mcp - Set Auth type to OAuth 2.1
- Save. If prompted, restart Open WebUI.
Can I use Workspace MCP with other clients or agent frameworks?
Yes. Any client compatible with the MCP spec can connect to your
endpoint at https://yoursubdomain.workspacemcp.com/mcp and
step through a standard OAuth authentication flow.
Common Errors & Troubleshooting
I'm getting error: missing required argument 'commandOrUrl' when adding the MCP in Claude Code.
This is almost always a paste formatting issue. When copying the command from an email or web page, invisible formatting characters can get included. Try:
- Type the command manually instead of pasting
- Paste into a plain-text editor first, then re-copy
- Use this exact string:
claude mcp add --transport http workspacemcp
                https://yoursubdomain.workspacemcp.com/mcp
I'm seeing Error 400: redirect_uri_mismatch during Google
authentication.
This means your OAuth client is not configured with the correct redirect URIs. To fix:
- Open your OAuth Client ID in Google Cloud Platform Console
- Confirm you're using the Web Application client type (not Desktop)
- Set Authorized JavaScript Origins to:
https://yoursubdomain.workspacemcp.com - Set Authorized Redirect URIs to:
https://yoursubdomain.workspacemcp.com/oauth2callback - Save and try again
If you used the Desktop client type, you'll need to recreate it as Web Application since Desktop clients don't have the redirect URI fields.
I'm getting a Cloudflare "Bad Gateway" error when trying to authenticate.
This typically happens right after initial setup when SSL certificates and DNS are still propagating. Wait 5–15 minutes and try again. This has resolved itself in every reported case without any intervention needed.
I see "Access blocked: This app's request is invalid" during sign-in.
This is the same redirect_uri_mismatch issue described above.
Verify your Authorized JavaScript Origins and Authorized Redirect URIs
are set correctly in the Google Cloud Platform console, and ensure you're
using the Web Application client type.
Cursor can't find MCP settings or the MCP pane doesn't appear.
Update Cursor to the latest version. MCP support was added in a recent update, and older versions won't show the configuration pane.
I see a "testing" or "unverified app" warning during the consent flow.
This is expected. We generally recommend keeping your OAuth app in testing mode unless you have a specific reason to make it publicly facing. Testing mode is fully functional — the only difference is the consent screen warning.
- The app works fine, but shows a warning screen during sign-in
- You may need to click "Advanced" and "Go to (app) (unsafe)" to proceed
- Verified public OAuth is only available when using the central client ID with no allowlist
- If you need a verified public-facing app or your organization blocks unverified apps entirely, see Google App Verification below
Google App Verification
My company blocks unverified Google OAuth applications. What can I do?
The best path depends on your organization's security posture, but here are your options in order of what we typically recommend:
- Provide your own client ID (recommended): Supply your own OAuth client ID and secret from your organization's GCP project. This is the strongest option for enterprise environments — your security team retains full ownership of the OAuth client, has access to Cloud Console audit logs, controls API rate limits and quotas, and can manage the app lifecycle through your existing governance processes. The app will be implicitly trusted within your domain since it lives in your own GCP organization. Client ID verification is included as part of the enterprise plan.
- Use your own GCP project with a personal account: Create the GCP project with a personal account that has admin access, then add your company email to the project via IAM. This lets you use the OAuth client from within your organization without going through a full procurement process.
- Use the Custom plan with your own client ID: If your organization blocks unverified apps or needs a stricter security posture, this is the right setup. It keeps OAuth, consent, and access control under your own Google Cloud project so your team has end-to-end control.
Multi-User & Agent Deployments
Can multiple users authenticate with the same Workspace MCP instance?
Yes. A single Workspace MCP Cloud instance can support multiple users, each authenticating with their own Google Workspace account. If you're using the allowlist model, each user's email address must be added to the allowlist.
Can I query across multiple mailboxes from one client (e.g. Claude Desktop or cowork)?
Yes. Each connection authenticates as a single Google account, so to reach several mailboxes you add the endpoint multiple times — once per account — as separate connectors (Claude Desktop) or MCP servers.
The trick is to give each one a distinct URL so your client treats them as different servers. Append a query string parameter naming the account to the end of your endpoint:
https://mcp.workspacemcp.com/[email protected]
https://mcp.workspacemcp.com/[email protected]
Name each connector after the mailbox it represents (e.g. Workspace MCP — archive01) and sign in to each with the matching Google account the first time you use it. Once both are authenticated, you can reference them by name in chat naturally, such as "tell me the unread email in archive01 and archive02, one at a time." This scales to as many mailboxes as you need.
Note: The ?email= value only changes the
URL so the client keeps the connections separate — each connector
still operates on whichever account you actually authenticate it with,
so make sure you sign in to the correct mailbox for each one.
Can I connect autonomous AI agents to Workspace MCP?
In theory, yes — any framework that supports MCP servers and OAuth logins should work. However, there are key considerations:
- The agent must be able to handle the Google OAuth login flow (including any browser-based consent screens)
- If MFA is enabled on the Google accounts, the agent needs to handle that as well, which can be complicated for autonomous operation
- Each agent connecting with a different workspace account needs that account on the allowlist
How does authentication work for remote AI agents?
Using any client compatible with the MCP spec, you connect to your MCP server endpoint and step through an OAuth authentication flow. Each agent framework has its own way of handling this. The flow is no different than any other OAuth remote MCP server — your agent needs to be able to complete the browser-based Google sign-in.
What's the difference between Workspace MCP Cloud and the Google Workspace CLI?
| Feature | Cloud | CLI |
|---|---|---|
| Multi-user support | Yes | No (single user) |
| Hosted/shareable | Yes | No (local only) |
| Authentication | OAuth 2.1, stateless | Same OAuth flow |
| Setup complexity | Managed for you | Self-maintained |
Security & Privacy
Is my data stored or cached by Workspace MCP Cloud?
Cloud deployments run in stateless mode by default. Credentials and session tokens are held in memory for the duration of a request and are not written to disk.
Requests are proxied directly to Google's APIs with the authenticated user's token. File-based debug logging is disabled, and attachments are returned directly rather than saved to the filesystem in the default setup.
Client secrets submitted during onboarding are stored only long enough to provision your instance, then purged.
If you need persistent sessions or disk-backed storage, encrypted disk and Valkey/Redis-backed modes are available on request. See the privacy page for the deeper architecture overview.
Feature Notes
Does Workspace MCP support Google Docs tab management?
Yes. Tab management features including creating, editing, and navigating document tabs are supported.
I have a feature request. How do I submit it?
Reply directly to your welcome email. Paying customers have priority on feature requests.
Cancellation
How do I cancel my subscription?
You can cancel at any time by ending your subscription. Your access will remain active until the end of your current paid-up period — 30 days from your last monthly payment. No further charges will be made after cancellation.
Quick Reference: Setup Checklist
Central endpoint (fastest path)
No setup work required on your end. Just:
- Add
https://mcp.workspacemcp.com/mcpto your client - Complete the Google sign-in flow
That's it — you're connected.
Custom subdomain + your own client ID (full control)
A one-time setup that gives you full ownership of your OAuth client and a dedicated endpoint. Once it's done, you don't touch it again.
- Create a Web Application OAuth client in Google Cloud Platform
- Enable required Google APIs (quick links in the GitHub README)
- Set Authorized JavaScript Origins to
https://yoursubdomain.workspacemcp.com - Set Authorized Redirect URIs to
https://yoursubdomain.workspacemcp.com/oauth2callback - Submit your client ID and secret at
https://workspacemcp.com/welcome - Wait for your subdomain and SSL certificate to be provisioned
- Add the MCP server to your client and complete the Google sign-in flow
If you see a "testing" warning on the consent screen, this is normal — your app works fine in testing mode.